
Morphic에서 만들 수 있는 마이크로드라마 비트
시작하기 전에 필요한 것
마이크로드라마는 세로형의 에피소드식 숏폼 스토리로, 보통 60~90초이며, 다음 클리프행어까지 시청자를 붙잡아 두도록 만들어집니다. TikTok, Reels, YouTube Shorts, 그리고 ReelShort와 DramaBox 같은 전용 앱에서 재생됩니다.
워크플로를 열기 전에 세 가지를 손에 쥐고 있어야 합니다. 한 문장 전제("한 여성이 죽은 줄 알았던 아버지에게서 온 편지를 연다"), 반복 등장 캐릭터(주연, 적대자, 한 번 이상 등장하는 누구든), 그리고 한 곳에서 세 곳의 로케이션입니다. 아래의 모든 것이 이 세 가지 위에 쌓입니다. 아직 없다면 계속 읽기 전에 적어 두세요.
Morphic에서 마이크로드라마가 만들어지는 과정
대본을 쓴다
75초 에피소드는 시작에 훅, 끝에 클리프행어를 둔 하나의 비트입니다. 통하는 형태는 다음과 같습니다.
- 0~10초: 훅. 하나의 이미지와 한 줄의 대사로 상황을 다시 세운다.
- 10~55초: 고조. 한 가지가 바뀌고 긴장이 올라간다.
- 55~75초: 클리프행어. 해결이 아니라 밝힘에서 끊는다.
장면 전환은 20초에 한 번으로 제한합니다. 새 로케이션은 AI가 드리프트할 또 하나의 기회이므로, 컷이 적을수록 에피소드가 더 탄탄해집니다.
대본은 그 뒤를 따르는 모든 것의 원천입니다.
- 모든 비트는 2단계의 숏 테이블에서 한 행이 됩니다.
- 대본이 호명하는 모든 반복 캐릭터는 3단계의 Character Reference Sheet가 됩니다.
- 장면이 거쳐 가는 모든 세트는 4단계의 Location Reference Sheet가 됩니다.
레퍼런스를 처음부터 쓰는 게 아니라, 대본에서 끌어냅니다.
숏을 계획한다
대본에서 곧장 생성으로 가지 마세요. 그 다리가 숏 테이블입니다. 번호, 프레이밍, 액션, 대사, 길이로 나열한 모든 숏입니다. 이것이 "그들은 주방에서 다툰다"를 AI가 생성할 수 있는 다섯 개의 구체적 프레임으로 바꿉니다.
먼저 앵커 숏을 계획하세요. 장면의 감정적 무게를 짊어지는 세 개에서 다섯 개의 키프레임(밝힘의 클로즈업, 무엇이 바뀌었는지 보여주는 와이드, 리액션 숏)입니다. 그 사이를 미디엄과 와이드 숏으로 채웁니다. 숏은 3~6초입니다. 32초짜리 편지 개봉 장면의 완성된 숏 테이블은 다음과 같습니다.
| # | 시간 | 프레이밍 | 액션 | 대사 |
|---|---|---|---|---|
| 1 | 0–4s | 와이드, 로우 앵글 | 마라가 주방으로 들어와 카운터에 가방을 내려놓는다 | 무음 |
| 2 | 4–9s | 미디엄, 어깨 너머 | 그녀가 테이블에서 뜯지 않은 봉투를 집어 든다 | 이게 뭐지? |
| 3 | 9–13s | 클로즈업, 손 | 그녀의 손가락이 봉인을 천천히 뜯는다 | 무음 |
| 4 | 13–19s | 클로즈업, 얼굴 | 그녀가 읽는다. 그녀의 눈빛이 바뀐다. | 무음 |
| 5 | 19–22s | 인서트, 편지 | 서명이 보인다. 한 단어: 아빠. | 무음 |
| 6 | 22–27s | 미디엄, 정면 | 그녀가 편지를 내린다. 눈물, 그러나 소리는 없다. | 그가 살아 있어. |
| 7 | 27–32s | 와이드, 뒤로 빠짐 | 그녀가 주방에 홀로, 얼어붙은 채 서 있다 | 무음 |
캐릭터 레퍼런스 시트를 만든다
장면을 생성하기 전에 반복 등장하는 각 캐릭터의 외형을 고정하세요. 캐릭터마다 두세 개의 앵커 속성을 고릅니다. 시그니처 의상, 헤어스타일, 액세서리 하나입니다. 지나치게 명세하면 역효과가 납니다. 골격과 걸음걸이에 대한 문단은 AI가 모든 디테일을 동등하게 붙들 수 없어서 숏마다 다른 캐릭터를 만들어 냅니다.
Character Reference Sheet 워크플로가 한 번의 실행으로 고정을 해냅니다. 장면별 표정 변형에는 Expressions 워크플로가 고정을 그대로 유지합니다.
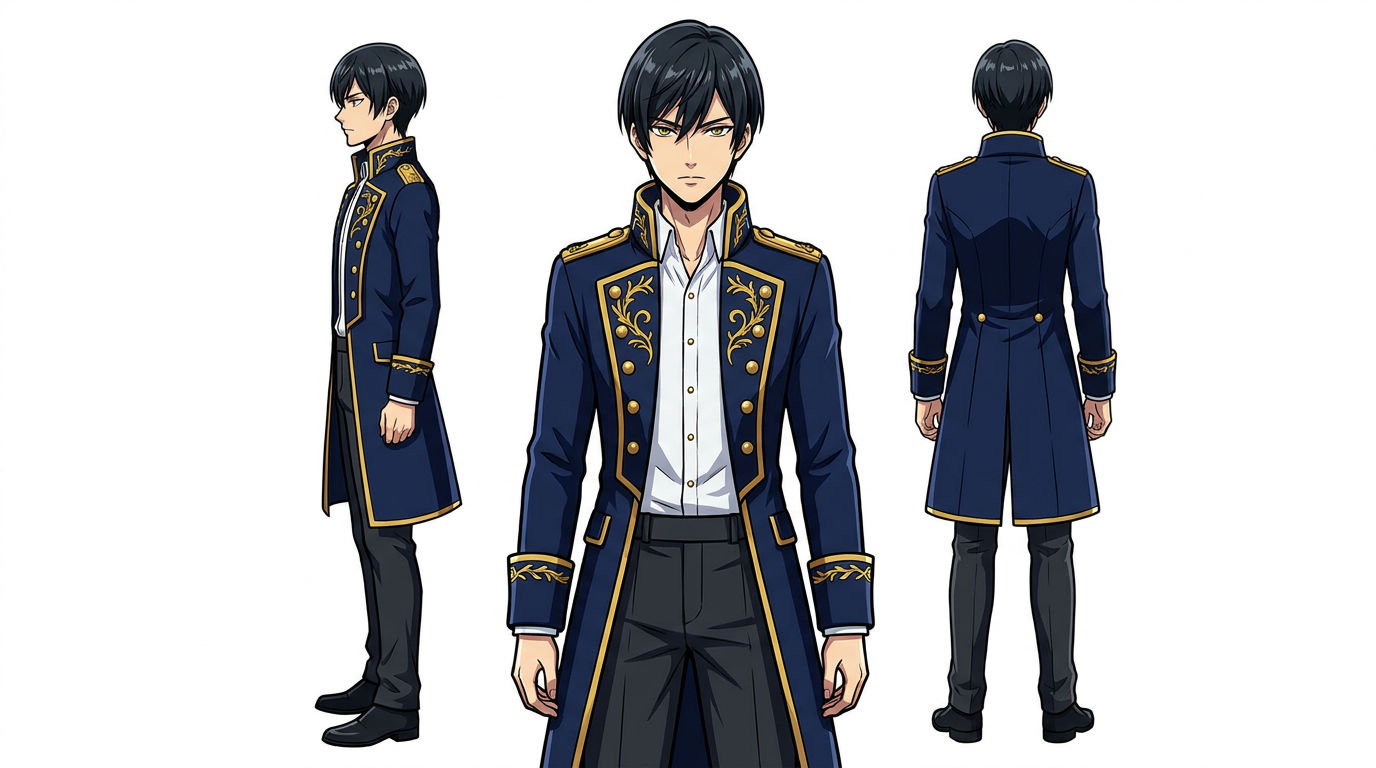
Character Reference Sheet
반복 등장하는 모든 캐릭터를 위한 재사용 가능한 시각 레퍼런스를 만들어, 시즌 내내 모든 숏에서 주연이 똑같아 보이도록 합니다.
Try this workflow로케이션 레퍼런스 시트를 만든다
한 번 이상 등장하는 모든 로케이션에 같은 작업을 합니다. 비결은 불변의 디테일입니다. 숏 사이에 바뀌어서는 안 되는 세트 안의 한 오브젝트(빨간 벽돌 벽, 황동 조명 기구, 금 간 타일 무늬)입니다. 그 로케이션의 모든 프롬프트에서 한 글자도 빠짐없이 똑같이 반복하면, 그 장소는 시즌 내내 그대로 같은 장소로 남습니다.
Location Reference Sheet 워크플로가 시트를 대신 만들어 줍니다. 서너 장 만들 즈음이면, 앞으로의 에피소드마다 추가 비용이 들지 않는 제작 라이브러리가 생깁니다.
Location Reference Sheet
반복 등장하는 모든 세트를 위한 재사용 가능한 시각 레퍼런스를 만들어, 시즌 전체에 걸쳐 장소가 그대로 같은 장소로 남도록 합니다.
Try this workflow장면을 스토리보드로 만든다
고정한 숏 테이블에 캐릭터와 로케이션 시트를 더해 Cinematic Storyboarding 워크플로에 입력하세요. 각 행에 대한 레퍼런스 패널이 나오며, 다음 단계를 구동할 준비가 됩니다. 손으로 하는 스토리보드 작업이 이것이 없애는 병목입니다.
Cinematic Storyboarding
장면 설명을 모든 행에 레퍼런스 패널이 달린 완전한 숏 테이블로 바꿉니다.
Try this workflow영상을 생성한다
5단계에서 모든 숏의 패널을 얻었습니다. Image to Video 도구가 각각에 움직임을 입힙니다. 패널을 입력하고, 카메라 무브와 캐릭터 액션을 프롬프트로 주면 영상 클립이 나옵니다.
오디오를 다루는 두 가지 방법이 있습니다. 빠른 길은 대사 큐, 음악 무드, 환경음을 같은 프롬프트에 묶어 오디오가 내장된 영상을 한 번의 패스로 돌려줍니다. 컨트롤 길은 먼저 깨끗한 영상을 생성하고, 이어지는 두 단계에서 대사, 스코어, 사운드 디자인을 따로 얹습니다. 핵심 대사 비트는 컨트롤 길을 받을 가치가 있지만, 컷어웨이와 B-roll은 그렇지 않습니다.
대사와 립싱크를 더한다
대사는 대부분의 AI 마이크로드라마가 이음매를 드러내는 지점입니다. 가능할 때는 Seedance 2.0에서 대사를 생성하세요. 영상과 같은 패스에서 립싱크를 만들어 냅니다. 다른 모델에서는 Lip Sync 도구가 사후에 입혀 줍니다. 둘 다 선택할 수 없을 때는 틈을 가립니다.
- 더 짧게 끊는다. 2초 숏은 너그럽지만 6초 숏은 그렇지 않다.
- 긴 대사 동안에는 입에서 각도를 돌린다.
- 모든 대사 장면 아래에 환경음을 깐다.
목소리 아래에 질감이 있으면 귀는 많은 것을 봐줍니다.
마무리하고 내보낸다
러프 컷과 완성된 에피소드를 가르는 것은 세 개의 레이어입니다.
- 오디오: 보이스오버에는 Speech, 스코어에는 Music, 분위기에는 Sound Effects. 대사 아래에 지속되는 패드 하나와 클리프행어에 모티프 하나면 충분합니다.
- 색: 모든 장면이 팔레트와 키 라이트 방향을 공유합니다. 한 에피소드 안에서는 타협 불가이고, 에피소드를 넘나들면 여유가 더 있습니다.
- 내보내기: Canvas에서 업스케일한 다음, 9:16, 1080×1920 이상으로 내보냅니다. 세로형 플랫폼은 공격적으로 압축하므로, 오버샘플링된 렌더는 압축을 견뎌 냅니다.
Made with Morphic
마이크로드라마 제작을 구동하는 것과 같은 워크플로로 만들었습니다.
마이크로드라마를 고품질로 느끼게 하는 것
| 품질 | 그 의미 | 왜 중요한가 |
|---|---|---|
| 캐릭터 일관성 | 주연의 얼굴, 체격, 시그니처 속성이 등장하는 모든 숏에서 동일하다 | 숏 사이의 드리프트는 이것이 진짜 드라마라는 착각을 깨뜨리는 가장 빠른 길입니다. |
| 로케이션 일관성 | 같은 세트가 장면과 에피소드를 넘나들며 같은 세트로 보이고, 조명과 팔레트도 포함된다 | 시청자는 무의식적으로 환경을 추적합니다. 컷 사이에 바뀌는 카페는 다른 카페로 읽힙니다. |
| 컷 간 연속성 | 카메라 위치, 캐릭터 배치, 배경이 숏에서 숏으로 이어진다 | 잘 찍은 장면은 AI 클립의 나열처럼 느껴지지 않고 연출된 장면처럼 느껴지기 시작합니다. |
| 영상과 음향의 정렬 | 대사가 비트에 떨어지고, 환경음이 모든 장면을 받치며, 음악이 클리프행어에서 부푼다 | 사운드는 러프 컷과 완성된 에피소드를 조용히 가르는 레이어입니다. |
피해야 할 흔한 실수
| 실수 | 무엇이 잘못되는가 | 해결책 |
|---|---|---|
| 캐릭터를 지나치게 명세하기 | 네 문단짜리 브리프는 AI가 모든 디테일을 동등하게 붙들 수 없어 숏마다 다른 캐릭터를 만들어 낸다 | 두세 개의 앵커 속성을, 모든 프롬프트에서 한 글자도 빠짐없이 반복한다 |
| 로케이션 시트를 건너뛰기 | 고정하는 것이 없어 세트가 장면 사이에 드리프트한다 | 한 번 이상 등장하는 세트에는 Location Reference Sheet를 만든다 |
| 5초를 넘는 모놀로그 숏 | 립싱크 불일치와 비율 드리프트가 드러날 시간이 더 많아진다 | 더 짧게 끊거나, 입에서 각도를 돌리거나, 네이티브 립싱크에 Seedance 2.0을 쓴다 |
| 조명 방향 뒤집힘 | 숏 1에서 카메라 왼쪽, 숏 2에서 카메라 오른쪽 키 라이트는 다른 장면으로 읽힌다 | 숏 테이블에서 키 라이트 방향을 계획하고, 장면의 모든 숏에서 유지한다 |
| 대사 아래에 환경음 없음 | 목소리만 있는 장면은 사소한 타이밍이나 생성 아티팩트를 증폭한다 | Sound Effects 도구로 모든 대사 장면 아래에 낮은 환경음 베드를 깐다 |
자주 묻는 질문
Character Reference Sheet 워크플로로 캐릭터를 한 번 고정한 다음, 모든 숏에서 고정된 시트를 참조하세요. 두세 개의 앵커 속성(시그니처 의상, 헤어스타일, 액세서리 하나)을 쓰고, 모든 프롬프트에서 한 글자도 빠짐없이 반복하세요. 지나치게 상세한 브리프는 드리프트를 줄이는 게 아니라 늘립니다.
60~90초가 세로형 소셜 플랫폼을 위한 실용적인 범위입니다. 60초보다 짧으면 클리프행어가 성립하는 일이 드뭅니다. 90초보다 길면 보상이 도착하기 전에 잔존율을 잃습니다.
네. Seedance 2.0은 대사와 립싱크를 한 번의 생성 패스로 처리합니다. 네이티브 립싱크가 없는 모델에서는 Lip Sync 도구로 사후에 입히거나, 더 짧게 끊고 긴 대사 동안 입에서 각도를 돌리세요.
숏 테이블을 만드세요. 프레이밍, 액션, 대사, 길이를 담은 모든 숏의 행별 목록입니다. 장면의 감정적 무게를 짊어지는 세 개에서 다섯 개의 앵커 숏을 먼저 생성한 다음, 그 사이를 미디엄과 와이드 숏으로 채웁니다. Cinematic Storyboarding 워크플로는 완성된 숏 테이블을 자동으로 레퍼런스 패널로 바꿉니다. 대본으로 시리즈 전체를 만들려면 AI 마이크로드라마 생성기로 시작하세요.
Seedance 2.0이 대사가 있는 어떤 에피소드에서든 기본 선택입니다. 립싱크를 한 번의 패스로 생성하기 때문입니다. 대사가 없는 장면에는, 고정된 캐릭터와 로케이션 레퍼런스를 넘겨주면 Morphic의 어떤 시네마틱 모델이든 강력한 결과를 냅니다.