
Morphicで作れるマイクロドラマのビート
始める前に必要なもの
マイクロドラマとは、縦型でエピソード仕立ての短尺ストーリーで、通常は60〜90秒、次のクリフハンガーまで視聴者を引きつけ続けるように作られています。TikTok、Reels、YouTube Shorts、そしてReelShortやDramaBoxといった専用アプリで再生されます。
ワークフローを開く前に、3つのものを手元に用意してください。一文の前提(「ある女性が、死んだと思っていた父からの手紙を開く」)、繰り返し登場するキャラクター(主役、敵役、複数回登場する人物)、そして1〜3か所のロケーションです。以下のすべては、この3つの上に積み上げられます。まだ用意できていないなら、読み進める前に書き留めておきましょう。
Morphicでマイクロドラマが作られる流れ
1.
脚本を書く
75秒のエピソードは、冒頭にフックを、最後にクリフハンガーを置いた1つのビートです。うまくいく形は次の通りです。
- 0〜10秒:フック。1つの映像と1つのセリフで状況を再提示する。
- 10〜55秒:エスカレーション。1つのことが変わり、緊張が高まる。
- 55〜75秒:クリフハンガー。解決ではなく、明かしのところで切る。
シーンチェンジは20秒に1回までに抑えます。新しいロケーションはAIがドリフトするもうひとつの機会なので、カットが少ないほどエピソードが引き締まります。
脚本は、後に続くすべての元になります。
- すべてのビートはステップ2のショット表の1行になります。
- 脚本が名前を挙げる繰り返しのキャラクターはそれぞれ、ステップ3のCharacter Reference Sheetになります。
- シーンが通過するすべてのセットは、ステップ4のLocation Reference Sheetになります。
リファレンスをゼロから書くのではなく、脚本から引き出します。
2.
ショットを計画する
脚本から生成へ直接進まないでください。その橋渡しがショット表です。番号、構図、アクション、セリフ、長さで一覧化したすべてのショットです。これが「彼らはキッチンで言い争う」を、AIが生成できる5つの具体的なフレームに変えます。
まずアンカーショットを計画します。シーンの感情的な重みを担う3〜5枚のキーフレーム(明かしのクローズアップ、何が変わったかを見せるワイド、リアクションショット)です。その間にミディアムとワイドのショットを埋めます。ショットは3〜6秒です。32秒の手紙開封シーンの完成したショット表は次の通りです。
| # | 時間 | 構図 | アクション | セリフ |
|---|---|---|---|---|
| 1 | 0–4s | ワイド、ローアングル | マーラがキッチンに入り、カウンターにバッグを置く | 無音 |
| 2 | 4–9s | ミディアム、肩越し | 彼女はテーブルから未開封の封筒を手に取る | これは何? |
| 3 | 9–13s | クローズアップ、手元 | 彼女の指がゆっくりと封を破る | 無音 |
| 4 | 13–19s | クローズアップ、顔 | 彼女は読む。その目が変わる。 | 無音 |
| 5 | 19–22s | インサート、手紙 | 署名が見える。一言:パパ。 | 無音 |
| 6 | 22–27s | ミディアム、正面 | 彼女は手紙を下ろす。涙、でも声はない。 | 彼は生きている。 |
| 7 | 27–32s | ワイド、引き | 彼女はキッチンに一人、固まって立っている | 無音 |
3.
キャラクターリファレンスシートを作る
シーンを生成する前に、繰り返し登場する各キャラクターの見た目を固定します。キャラクターごとに2つか3つのアンカー属性を選びます。シグネチャーの衣装、ヘアスタイル、1つのアクセサリーです。指定しすぎると裏目に出ます。骨格や歩き方についての段落は、AIがすべての細部を等しく保持できないため、ショットごとに別人を生み出します。
Character Reference Sheetワークフローは、1回の実行で固定を行います。シーンごとの表情バリエーションには、Expressionsワークフローが固定を保ったまま対応します。
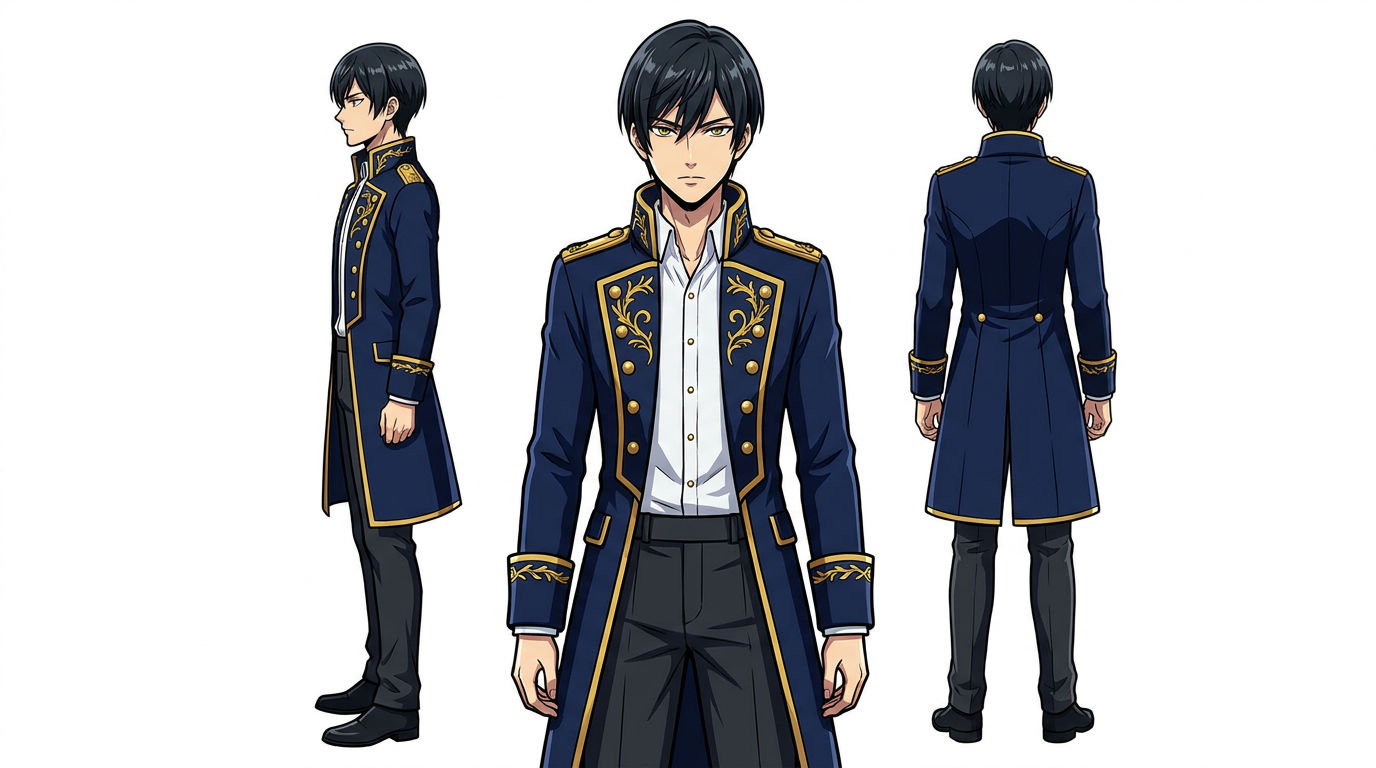
Character Reference Sheet
繰り返し登場するすべてのキャラクターに再利用できるビジュアルリファレンスを作り、シーズン中ずっとどのショットでも主役が同じ見た目になるようにします。
Try this workflow4.
ロケーションリファレンスシートを作る
複数回登場するすべてのロケーションに同じことを行います。コツは不変のディテールです。ショット間で変わってはいけないセット内の1つのオブジェクト(赤レンガの壁、真鍮の照明器具、ひびの入ったタイルの模様)です。そのロケーションのすべてのプロンプトで一字一句そのまま繰り返せば、その場所はシーズンを通して同じ場所のままです。
Location Reference Sheetワークフローがあなたのためにシートを作ります。3〜4枚作る頃には、今後のエピソードごとに費用のかからない制作ライブラリが手に入ります。
Location Reference Sheet
繰り返し登場するすべてのセットに再利用できるビジュアルリファレンスを作り、シーズン全体を通して場所が同じ場所のままであるようにします。
Try this workflow5.
シーンをストーリーボード化する
固定したショット表に加え、キャラクターとロケーションのシートをCinematic Storyboardingワークフローに入力します。各行のリファレンスパネルが得られ、次のステップを動かす準備が整います。手作業のストーリーボードはこれが取り除くボトルネックです。
Cinematic Storyboarding
シーンの説明を、各行のリファレンスパネル付きの完全なショット表に変えます。
Try this workflow6.
動画を生成する
ステップ5で、各ショットのパネルが手に入りました。Image to Videoツールがそれぞれを動きにします。パネルを入力し、カメラの動きとキャラクターのアクションを指示すると、動画クリップが得られます。
音声の扱い方は2通りあります。速い方法は、セリフのキュー、音楽のムード、環境音を同じプロンプトにまとめ、音声を埋め込んだ動画を1回のパスで返します。コントロールの方法は、まずクリーンな動画を生成し、続く2つのステップでセリフ、スコア、サウンドデザインを別々に重ねます。主要なセリフのビートはコントロールの方法に値しますが、カットアウェイやB-rollはそうではありません。
7.
セリフとリップシンクを加える
セリフは、ほとんどのAIマイクロドラマが継ぎ目を見せる場所です。できるときはSeedance 2.0でセリフを生成しましょう。動画と同じパスでリップシンクを生み出します。他のモデルでは、Lip Syncツールが後付けします。どちらも選べないときは、ギャップを隠します。
- もっと短く切る。2秒のショットは寛容ですが、6秒のショットはそうではありません。
- 長いセリフの間は口元から角度を逸らす。
- すべてのセリフシーンの下に環境音を重ねる。
声の下に質感があると、耳は多くを許してくれます。
8.
仕上げて書き出す
ラフカットと完成エピソードを分けるのは3つのレイヤーです。
- 音声:ナレーションにはSpeech、スコアにはMusic、雰囲気にはSound Effects。セリフの下に持続するパッドを1つ、クリフハンガーにモチーフを1つで十分です。
- カラー:すべてのシーンがパレットとキーライトの方向を共有します。1つのエピソード内ではこれは譲れません。エピソードをまたぐと、もっと自由度があります。
- 書き出し:Canvasでアップスケールし、9:16、1080×1920以上で書き出します。縦型プラットフォームは激しく圧縮するので、オーバーサンプリングされたレンダリングは圧縮に耐えます。
Made with Morphic
マイクロドラマ制作を動かすのと同じワークフローで作られました。
マイクロドラマを高品質に感じさせるもの
| 品質 | その意味 | なぜ重要か |
|---|---|---|
| キャラクターの一貫性 | 主役の顔、体格、シグネチャー属性が、登場するすべてのショットで同一である | ショット間のドリフトは、これが本物の番組だという錯覚を壊す最も速い方法です。 |
| ロケーションの一貫性 | 同じセットが、シーンやエピソードをまたいで同じセットに見え、照明とパレットも含む | 視聴者は無意識に環境を追っています。カットの間に変わるカフェは、別のカフェとして読み取られます。 |
| カット間の連続性 | カメラ位置、キャラクターの配置、背景がショットからショットへ引き継がれる | うまく撮られたシーンは、AIクリップの連なりに感じられなくなり、演出されたシーンに感じられ始めます。 |
| 映像と音声の整合 | セリフがビートに乗り、環境音が各シーンを支え、音楽がクリフハンガーで高まる | サウンドは、ラフカットと完成エピソードを静かに分けるレイヤーです。 |
避けるべきよくある間違い
| 間違い | 何がうまくいかないか | 対処法 |
|---|---|---|
| キャラクターを指定しすぎる | 4段落のブリーフは、AIがすべての細部を等しく保持できないため、ショットごとに別人を生み出す | 2つか3つのアンカー属性を、すべてのプロンプトで一字一句そのまま繰り返す |
| ロケーションシートを省く | 何も固定しないため、セットがシーン間でドリフトする | 複数回登場するセットにはLocation Reference Sheetを作る |
| 5秒を超えるモノローグショット | リップシンクのずれと比率のドリフトが表面化する時間が増える | もっと短く切る、口元から角度を逸らす、またはネイティブのリップシンクにSeedance 2.0を使う |
| 照明方向の反転 | ショット1でカメラ左からのキーライト、ショット2でカメラ右からだと、別のシーンとして読み取られる | ショット表でキーライトの方向を計画し、シーンのすべてのショットで保つ |
| セリフの下に環境音がない | 声だけのシーンは、わずかなタイミングや生成のアーティファクトを増幅する | Sound Effectsツールで、すべてのセリフシーンの下に低い環境音のベッドを重ねる |
よくある質問
Character Reference Sheetワークフローでキャラクターを一度固定し、各ショットで固定したシートを参照します。2つか3つのアンカー属性(シグネチャーの衣装、ヘアスタイル、1つのアクセサリー)を使い、すべてのプロンプトで一字一句そのまま繰り返します。詳細すぎるブリーフは、ドリフトを減らすのではなく増やします。
60〜90秒が縦型ソーシャルプラットフォーム向けの実用的な範囲です。60秒より短いとクリフハンガーが成立することはまれです。90秒より長いと、ペイオフが届く前にリテンションを失います。
はい。Seedance 2.0はセリフとリップシンクを1回の生成パスで処理します。ネイティブのリップシンクがないモデルでは、Lip Syncツールで後付けするか、もっと短く切って長いセリフの間は口元から角度を逸らします。
ショット表を作ります。構図、アクション、セリフ、長さを備えたすべてのショットの行ごとのリストです。まずシーンの感情的な重みを担う3〜5枚のアンカーショットを生成し、その間にミディアムとワイドのショットを埋めます。Cinematic Storyboardingワークフローは、完成したショット表を自動でリファレンスパネルに変えます。台本からシリーズ全体を制作するなら、AIマイクロドラマジェネレーターから始めましょう。
Seedance 2.0は、セリフのあるどのエピソードでもデフォルトです。リップシンクを1回のパスで生成するからです。セリフのないシーンには、固定したキャラクターとロケーションのリファレンスを渡せば、Morphicのどのシネマティックモデルでも力強い結果を生み出します。